Interact with this post using Mastodon or
My [uni]Corne keyboard (Part 2/2)
Published on
A hardware always hide a software
A wired corne uses the quantum mechanical keyboard (QMK) firmware to run on the Nice!Nano but if you go with a wireless version you will need the zephyr mechanical keyboard (ZMK) open-source firmware.
You can find all the info to write your keymap (and way more) on the very well written zmk website
. Once you’re ready, you will have to flash it on your Nice!Nano.
This can be done with your own github repository (see instructions here
) or you can locally build the uf2 files to be flashed on your keyboard. I went with this second option since I don’t have to use github and I can control everything locally even without an internet access.
The steps to install the required tool (west) can be found here
.
If you’re not happy with your keymap, it’ll take 10 seconds to generate new files and flash them again.
Note that your Nice!Nano will be recognized as a mass storage the first time you connect it to your computer but once flashed you’ll have to put your keyboard in bootloader mode if you want to flash new files. To do so, simply press the reset button twice and your keyboard will be recognized as a mass storage again.
Here are also few configuration options you may want to implement in your config file before generating the uf2 files:
CONFIG_ZMK_SLEEP=y # enable the sleep option to use the following option
CONFIG_ZMK_IDLE_SLEEP_TIMEOUT=3600000 # put your keyboard in sleep after X ms
CONFIG_BT_CTRL_TX_PWR_PLUS_8=y # increase the blutooth connection strength with no impact on the battery life
CONFIG_ZMK_KEYBOARD_NAME="Cute Name" # give a cute name to your keyboard
More options can be found here
Once you have your keyboard running you’d certainly like to keep an eye on the battery level if you’re not using a display. In Linux, you can use upower and grab the info with upower --dump. Be aware that the right half of your keyboard will communicate to the left side only while the left side will communicate with the right side and your computer. That means only the battery level of the left side will be reported.
This is not a big deal because this side is the one that will last the least (due to the dual communication) and you’ll still be able to use your keyboard when charging through USB-C.
How it is in real life?
Battery life
Here are some battery life data for all different scenari based on the zmk estimator :
| Nice!View | Backlight | RGB | Battery life left (110mAh) | Battery life right (110mAh) |
|---|---|---|---|---|
| No | No | No | 1 week 6 days +/- 3 days | 3 months 1 week +/- 1 month |
| Yes | No | No | 1 week 6 days +/- 3 days | 2 months 3 weeks +/- 3 weeks |
| Yes/No | Yes | No | 18 hours 31 minutes +/- 4 hours | 19 hours 28 minutes +/- 5 hours |
| Yes/No | No | Yes | 1 hour 1 minute +/- 13 minutes | 1 hour 1 minute +/- 13 minutes |
| Yes/No | Yes | Yes | 58 minutes +/- 13 minutes | 58 minutes +/- 13 minutes |
(data with 50% asleep and 50% backlight/RGB brightness
with 12 hours of use per day)
As mentioned earlier, you can use your keyboard while it’s charging via USB-C. The Nice!Nano has a led that will light orange when charging and turns off when charged.
Layers
The first thing that comes to mind where you look at a 36-key keyboard is: where are the other keys? They are accessible through layers. So the next question is: what is a layer?
Layers
can be intimidated at first but you can think of a layer as a map with some keys which offers a wide range of options. Indeed, you can switch between layers (“creating” a full new keyboard on every switch) or you can put layers on top of each other which will expand your default keyboard by temporarily adding new keys.
Everyone organize the layers differently, that’s the whole point of building such a keyboard. It’ll mainly depend on your typing style, which key are the most useful to you, and what keybindings you use.
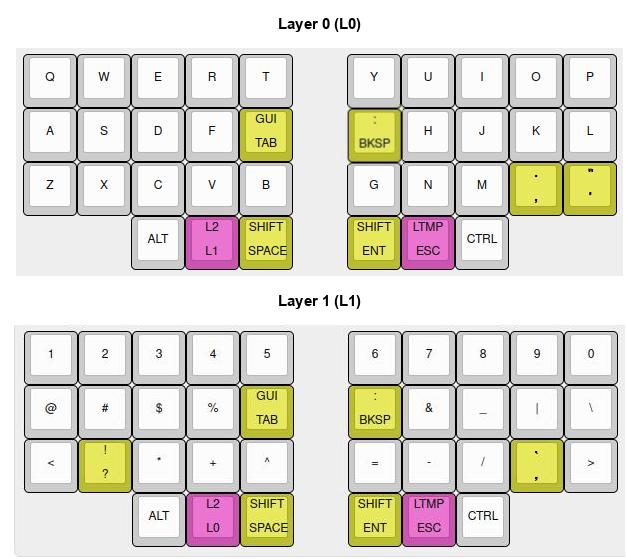
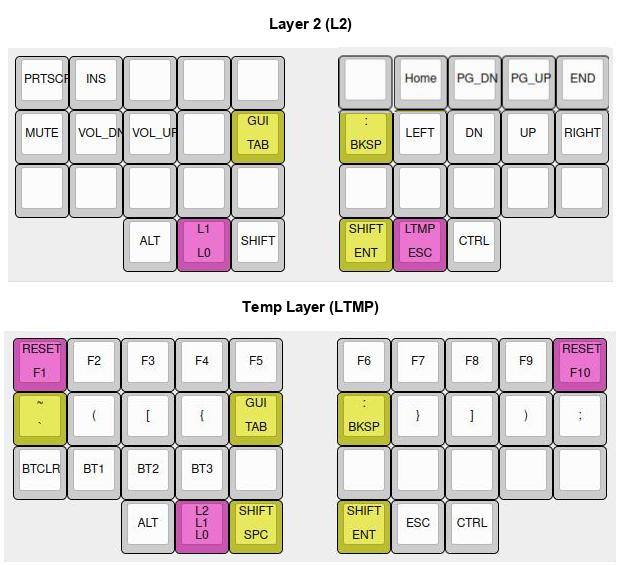
For inspiration, here are my layers that may evolve with practice:
(yellow keys: bottom is the default, top is activated by holding Shift pink keys: one tap sends the bottom command, 2 taps sends the top command)

L1 has the numbers and symbols (with no need to hold Shift to use them), as well as numerical operation signs and less used punctuation marks)

LTMP has the useless F keys, and all parentheses, plus the bluetooth switches BTW, you can connect up to 5 devices and bluetooth jumps from one device to another is instantaneous)
The typing experience
At first your typing speed dramatically decreases (by 50-70%) because you’ll have to train your brain again from scratch and fight against muscle memory built over the years. It took me 2 days to stop thinking which layout is hosting which keys, to adjsut to the ortholinear layout, and to fill normal to not move my hand like crazy from one end of the leyboard to the other. From others feedback, it usually takes 2-3 weeks to catch-up on your average typing speed. Time will tell.
With only 4 days of regular use, I can tell for sure that my wrists feel less tired and I can see the potential for a better typing experience in the future. It is awesome to be able to adjust the keyboard to your hands/arms position and not the other way.
An additional benefit is the 15 degree tenting position applied to the keybaord. But this is really a personal preference and some prefers it flat or with a higher inclination.
Always close with a debate
In the game of mechanical keyboards, there are different switches. The biggest players are probably Cherry MX, Gateron, and Kailh. I went with Kailh switches because a 5-column PCB was only available for Kailh switches.
Regarding the typing performance, online reviews usually report Kailh to be good quality but a bit stiffer than Cherry. With no prior experience, I can’t comment on that but so far my Kailh red pro switches work well and feel good enough. Also, there are tricks (lubing, filming, o-rings) to optimize your switches. I may try them but that means not using the little guy for some time ^^
If you’re still reading this post and are thinking about building you own keyboard with Kailh switches, choosing the right switches may be the most tricky part of the process. Here is a list of all available switches with their specs to help you with this decision:
| Model | Type | Operating force | Pre-travel | Total travel |
|---|---|---|---|---|
| Choc Pink/Light Blue (gChoc) | Linear | 20gf | 1.5mm | 3.0mm |
| Choc Purple | Linear | 25gf | 1.5mm | 3.0mm |
| Choc Red Pro | Linear | 35gf | 1.5mm | 3.0mm |
| Choc Silver | Linear | 40gf | 1.5mm | 3.0mm |
| Choc Red | Linear | 50gf | 1.5mm | 3.0mm |
| Choc Black | Linear | 60gf | 1.8mm | 3.0mm |
| Choc Dark Yellow | Linear | 70gf | 1.5mm | 3.0mm |
| Choc Brown | Tactile | 50gf | 1.5mm | 3.0mm |
| Choc Burnt Orange | Tactile | 70gf | 1.5mm | 3.0mm |
| Choc White | Clicky (subtle) | 50gf | 1.5mm | 3.0mm |
| Choc Jade | Clicky(loudest) | 50gf | 1.5mm | 3.0mm |
| Choc Robin | Clicky (loud) | 57gf | 1.5mm | 3.0mm |
| Choc Navy | Clicky (loudest) | 60gf | 1.5mm | 3.0mm |
| Choc Pale Blue | Clicky (loud) | 70gf | 1.5mm | 3.0mm |
(Linear switches: when pressing down the switch, there are no bumps or variances in force required to press it further.
Tactile switches: around their actuation point, you’ll feel a difference in force so you can feel when a switch has actuated.
Clicky switches: they have a bump in their curve like tactile switches. They also make a distinct clicky sound.)
- My [uni]Corne keyboard (Part 1/2)
- My [uni]Corne keyboard (Part 2/2)
More food for thoughts? Check other posts about: #System
Thanks for your read. Hope it's been useful to you.
✄ ┈ ┈ ┈ ┈ ┈ ┈ ┈ ┈ ┈ ┈ ┈ ┈ ┈ ┈ ┈ ┈ ┈ ┈ ┈ ┈ ┈ ┈ ┈ ┈ ┈ ┈ ┈